Posts

Showing posts from 2020

Troggoth Painting Skin Guide

Image
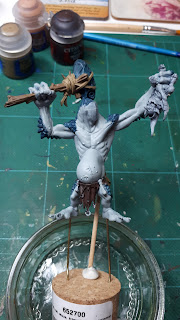
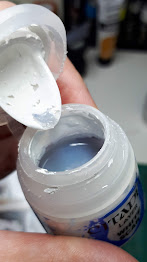
As I am currently unable to get hold of a webcam due to them being snapped up by everyone working from home, I thought I would try and do a blog post on how I paint skin. Following up on my earlier post on the technical side of things with the Sara bust I painted, this is how I go about it.  Using the troggoths that I have been painting recently my process can be summed up in a few steps:  1) lay down a good base coat, in the troggs case, this was Celestial Grey 2) sketch in the shadows     This is probably one of the main steps. As this is where I establish where my shadows and highlights are going to go and will set me up for the rest of the painting.  Using my own mix of Navy Blue ( scale colour), Naggroth Night and Magos Purple, I sketched in where I wanted the shadows to be:  As you can see this stage is pretty messy, as I'm using a very thinned paint in order to establish the values I need on the mini. Don't feel disheartened at this point as you are going to tidy it up!

Tip #1 - Get To Know Your Paints

Image
I'm hoping to do a series of tips, taken from the do's and don'ts blog I did a little while ago, with the aim of expanding further on them with an in depth look to help new and establish painters. Who knows, they might prove useful to you! Getting to know your paints So, you've just gone out and bought a tonne of paints and want to crack on with your painting. That's great, however... just a word of warning, that red you bought may not be the colour you thought it was. In fact, that red has purple in it and purple isn't what you wanted in your colour scheme.  It may seem like something you wouldn't need to consider but unless you are buying a primary colour, secondary, tertiary colours are made up of lots of other colours. Half the time to me, it just seems like an illusion to appease our eyesight.  Even black can be made up of brown or blue or purple, because those are their core mixtures. White as well, will usually have blue in it because that makes a bri

Miniature Painting Techniques - Jargon Buster

Following a recent IG conversation with a new painter I thought it might be a good idea to write a post to help those who are new, with some of the technical terms they may come across in their painting journey. I know some of these confused me when I returned from a 15 year hiatus over a year ago.  I'm only going to go over briefly each technique as there is quite a few and other artists on all social media platforms have covered each and everyone of these in greater detail than I need to go into here. So if you find one you want to look into further you need only do an internet search and you will have a vast swathe of resources at your fingertips. So let's begin! ******************************************** Blending - there are several techniques that fall under this main heading, but this is the general term for mixing two or more colours together creating a gradient from one to the other.  Contrast - I think this is probably the most commonly espoused

Painting Skin With 4 Colours

Image
The skin on this bust was painted using just 4 colours. It was something I found on Pinterest which was a guide on mixing flesh tones, mainly for oils, but I wondered if I could apply the same technique with my acrylic paints. This model was a practice piece anyway so it didn't really matter if my experiment went horribly wrong! The guide does not have any revolutionary new ways of doing things, this is a very commonly used technique.  Basically you take the following paints: Cadmium Red, Yellow Ochre, Ultramarine Blue, Titanium White.  As I do not have these colours in acrylics I then thought what is the closest colours I do have? So I picked Mephiston Red, Averland Sunset and Ceremite White (all GW) and Blue from the Vallejo air range.  The guide recommends the following:  Think in terms of light and shadow Use a limited palette  Mix the main colours first - light flesh and dark flesh Avoid adding white to your shadows (this I found was terribly difficu

Forest Diorama

Image
I had this one in mind for a smaller Armies on Parade display for a Corvus Cabal Warcry band. I have a large woods behind where I live and there are a lot of crows about and that's where the idea originated, I wanted a Corvus Cabal war band who hunted in the forests of Ghyran, but were heading out to the Eightpoints to join Archaon's ranks. My diorama would be their origin story, of sorts. My other half already had the Awakened Wyldwood box that came with 3 trees, so the idea kinda of grew from there.  I knew I didn't want it to be huge, asides from my goblin cave I made last year, it's been a while since I've made scenery/diorama. It was a regular thing when I was a kid, I even made a cathedral out of graph paper one time, only to reproduce the whole monastery for an art class end of year project, that I also used to help get me into art college. So I'm a bit rusty and it's always a good idea to go easy when you're trying to get back into something

Raptoryx - Chaotic Beasts

Image
As we are currently in lockdown, and I have no painting competitions to do I have decided to try and get as much off my desk as possible. Including these guys, that have been sat gathering dust for the last 8 months. They've been done to table top standard and done mostly with Contrast paints to make it as quick as possible. The first one I did on its own just as a colour test, using a bearded vulture as my inspiration, as they remind me of vultures hunting across a savannah in search of carrion or unwary adventurers.  Just a note if you haven't already built yours, don't stick them to their bases until you've painted them. They are really low to the base and a pain to paint underneath with the base in the way.  Base coat them with wraith bone spray and then I did the following process to paint mine up. Base coats:  Head - Basilicanum Grey Body - Gryph-hound orange Wings, feathers, tail tip, claws, spikes (not wing-claws), back of ruffle - Black

Thinning Your Paints

Image
In this post I hope to help those who are struggling to understand what 'thin your paints!' actually means. Figuring this out myself was actually something I discovered by accident and may happen the same for you. A happy accident of course. I was attempting a satin effect on my Lady Olynder model (which did not work by the way!) however, the effect I ended up with was actually far better for the mini. I was basically thinned my paints down to watercolour paint consistency, and layered them up. This isn't a quick method and happens without you realising, because it is so slow, but it is very effective. This follows on from the 'mediums' post and as you can see in the picture above I have tried to provide some examples of paint mixed with these mediums and different types of paint.  1 - this is Mephiston Red straight out of the pot. You can see how thick and pigment heavy this paint is and I never recommend you use this paint in its non-diluted

Using Mediums

Image
This was supposed to be part of the 'Thinning Your Paints' post but ended up being bigger than planned so I've left it on its own post. Hopefully this will be of use if you are considering using something other than water! This is only a small selection of what is available out there. So I advise you to explore and experiment and of course, have fun! Using Mediums Although water is more than sufficient to thin your paints with, I only use it when I'm blocking in colours on a mini. When I get down to the nitty-gritty of the actual paint job my go to medium is Vallejo's 'Glaze Medium'. 3rd one along from the left in the picture above. As you can see from the picture I have quite a few mediums! Here's a run down of them: Lahmian Medium: used to thin paints without actually watering down the pigment in the paint.  I'm not a big fan of this one as I find it makes the paint go a bit gloopy and does have a bit of sheen on it,  it is very goo

Do's and Don't's of Miniature Painting

Image
Another post for #whitebeltpainting that new painters should take into consideration, I know I certainly didn't think about some of these when I started again last year. I actually thought I would end up with more don't's than do's but I have ended up with more positives which is good! I will keep adding to the list as I think of things but these are what I've encountered so far, hopefully they will help you too. Do: Exercise! Our hobby is a sedentary activity (note the irony in that sentence...). Take breaks often and do some exercise, go for a walk, go to the gym, find something you enjoy. Your back and neck will thank you. Use a wet palette as soon as you can. You do not need a super-duper swanky purpose made one. I have been using a Tupperware box, kitchen roll (you can use a sponge, I didn't get on with these) and baking paper for a year and it still works fine for me. Get a colour wheel, either RYB or CMY or both! Watch plenty of YouTube vi

Painting Tips

Image
This is something I wanted to do following the #whitebeltpainting created by @agreatguy_paints on Instagram. This post will mainly focus on preparing for painting competitions, seeing as this is what my main focus is and the area I am trying to work on improving. As and when I think of them as I progress through my paintings. These will also appear in my stories as a saved highlight (when I get round to it). So, without further ado... Painting Tip #1 - plan your colour scheme This may seem a little superfluous to the overall painting of your mini, but I always need to have a plan of some sorts in place before I start painting. Even if it's just picking two colours off the colour wheel as a starting point: 'I want the main colour on this mini to be green'.  If you haven't already, get a colour wheel. Either one you can have in your hand or there are plenty of apps for this.  Get to grips with a little colour theory. You don't need to go nuts on this,

TMM Tutorial

Image
On my last painting, the Stormcast Lord Aquilor, I decided to try TMM, or true metal metal. I have tried non-metal metal, but that is something I think I will focus on another year.  This year though I have clicked with TMM and did myself (and anyone else who is interested) a little guide on Instagram, but thought I would include here in my blog. As a side note the Lord Aquilor painting is why I've been lacking in posts and updates on here. I literally was getting home from work and painting for 3 hours and then about 5 hours each day at the weekends for four weeks. So that model had about 80 hours worth of work put into it. Please see that post for more information. So on with the guide: I tend to base most thing in Celestra Grey, as it just covers really nicely, once you get a good base coat down as I tend to use 3-5 thin coats in order to do this. Paints used in this example are below, where I've used Scalecolour I've put alternate GW ones: Games Workshop :