
Forest Diorama
I had this one in mind for a smaller Armies on Parade display for a Corvus Cabal Warcry band. I have a large woods behind where I live and there are a lot of crows about and that's where the idea originated, I wanted a Corvus Cabal war band who hunted in the forests of Ghyran, but were heading out to the Eightpoints to join Archaon's ranks. My diorama would be their origin story, of sorts. My other half already had the Awakened Wyldwood box that came with 3 trees, so the idea kinda of grew from there.
I knew I didn't want it to be huge, asides from my goblin cave I made last year, it's been a while since I've made scenery/diorama. It was a regular thing when I was a kid, I even made a cathedral out of graph paper one time, only to reproduce the whole monastery for an art class end of year project, that I also used to help get me into art college. So I'm a bit rusty and it's always a good idea to go easy when you're trying to get back into something and don't expect your model to look like it belongs on the set of a Lord of the Rings movie! (oh I had such big dreams as a kid...)
Anyway, initially for this project I found the ideal size bit of cardboard for my main base (thank you Ikea) from which I had a rough idea what I wanted it to look like. I knew each tree on a different level, with a river running through the middle and drew up the final layout on the cardboard base before then using tracing paper to copy it. I then cut up the tracing paper into the sections I needed, before then building the 2-D image into a 3-D one, you can see this on the photo below:

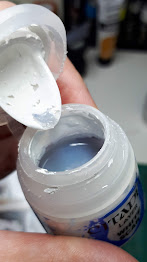
I used foam card for the layers (easily bought from good ol' Amazon - 10 pack of A3). Once I was happy with the layout I glued these down with PVA. When that was dry I then pulled out my trusty tub of Polyfiller and applied along the trim of the foam card to smooth out the gradients in-between each level and marked out the river bed. Once that was dry I then had the fun task of placing rocks.

I have a whole tub of plaster cast rocks, it's great, (and yes I am sad - but I really don't care :p). I needed to elevate the sides of the waterfall at the back and place the odd one here and there to add texture to the base. There is no exact method for this, just have fun and see what looks good.

Once happy with where the rocks would go I stuck them down with a lot of PVA and filled the gaps in with more PVA. The next was the sand stage and with even more PVA painted where I wanted the sand and smaller rocks to go.

The next stage was to spray the whole base with chaos black rattle can, you can do this with an airbrush but as I have a love/hate relationship with my airbrush I opted for the can. You'll need to make sure you've covered the innards of the foam card with polyfiller because the spray will melt the plastic foam! But if that's a look you want then don't worry!
Then it was on to painting the river bed, which turned out a bit of a failed experiment, but might be ok once finished (this is still a work-in-progress as I write). I started off with blue-ish grey tones before then building up to grey, but then realised I didn't really want the river bed to be grey I wanted it to be more brown, so gave it a heavy wash of Agrax Earthshade and then started playing around with basing materials for the sides of the river bed as these needed building up.


I had intended on sticking the trees to the base but thought afterwards they'll look just as good sat on top, as long as no one knocks it they'll be fine. I want to flock the bases of the trees in the same I use for the base so at least it will match. I didn't have what I wanted for a forest flock so I went shopping on MDP and Rival Crafts websites and managed to pick up some bits and pieces that I think will be good. I now just need to experiment a bit and probably mix and match some stuff to get the look I'm after. So that's what I have so far. More updates to come!
Comments
Post a Comment